Pages

Showing posts with label Garage. Show all posts

Oct 20, 2014

Plumb Crazy

Steve managed to sqeeze in one last DIY project before Connor was born.  The good news is that he managed to fix something that's been broken since we bought the house!  The bad news is that we hadn't planned on DIYing this project at all, but were driven to from a series of odd events.

Our hose bibs have been messed up from the get-go with this house.  We knew when we purchased the house that the hose bibs lacked knobs to turn the water on and off.  No biggie, we thought.  Hose knobs are easy to come by and not terribly difficult to install.  So when it came time to buy the correct knob, a closer inspection of the hose bib revealed that a new knob wasn't what we needed.  The gasket the knob would normally attach to was completely stripped.  This was the same for the spigot in the front of the house and the one in the back.

Stripped.

We knew at that point that we'd likely need to replace the entire spigot, and this was confirmed by a couple different plumbers when we were gathering estimates for our bathroom reno (you can read about that here).  But way back then, we had other, more pressing projects going on, so we saved our money and went with a stupid-simple hack that only cost us a few bucks.

Stripped and clamped.

That tiny clamp served us well as a makeshift knob for two years.  And then one of the clamps got lost.  And then I planted some things on the north side of my house.  And then the spigot that still had a clamp-for-a-knob started to shoot water from the gasket, which meant that the scary-pregnant lady that lived in our house had to water her window boxes with a watering can.  I broke down in early July and informed Steve that I'd be calling some of the plumbers we talked to last fall to get an estimate and schedule a time for our hose bibs to be replaced.

I called the plumber that we were talking about using last fall before we decided to DIY the bathroom and left a voicemail.  His Yelp account showed a few more very positive reviews since the previous fall, and he was one of our cheapest estimates (plus a generally polite and well spoken guy), so I was excited to get him out to our house ASAP.  Four days later, I still hadn't heard from him so I called and left another voicemail.  A week later I still hadn't heard from him so I called and left yet another voicemail.  He called me back the same day to tell me that he had been on vacation, and would give me a call when he got back into town the following Monday.  I thanked him for getting back to me and agreed.  Well, the following Monday he called to say he had just gotten back into town and would call me later in the day to schedule an appointment.  He never did.  I tried calling him one more time and never heard back from him.  So disappointing.  A few more phone calls to local plumbers meant we'd end up spending about double what the non-responding guy was going to charge, or we'd have to go with someone we didn't really trust.  

So we did what we usually do, which is watch a ton of youtubes and just give it a go ourselves.  We figured if we really screwed it up, we'd just end up calling a plumber and spending an arm and a leg anyway.  At least if we tried it ourselves, we'd have a chance to saving some money.

Steve decided to try the hose bib in the back of the house first.  It would matter less if it ended up not being aesthetically pleasing, but most of all the plumbing was exposed in our garage.  It was easy to get to and would cause far less damage to the house if we screwed things up.

A series of tubes.

Steve ended up replacing most of this section of pipe- the pipe to the left goes through the back of our garage and out to the hose bib.  I won't pretend to know how he did it, but after a few hours, $80ish worth of materials (take that, $400 estimate!), and a few magic swear words, we had a brand new hose bib WITH A KNOB that worked perfectly and didn't leak.  I could finally water those window boxes with a hose instead of schlepping around a watering can!

Hooray, a functional knob!

It's not sexy, but it finally works!


The hose bib in the front still needs to be fixed.  We waited for a couple of reasons.  The pipe behind our spigot in the front of the house runs in through the coat closet near our front door and will require cutting through drywall to access, so the risk of damaging our house is much higher.  That also means it will require patching the drywall when we're done, which is a pain in the butt.  Also, I had a baby about 4 days after Steve fixed the hose bib in the back, and we haven't had a lot of free time since then that hasn't been consumed with being completely exhausted.  Steve has promised me he'll fix the one in front by the end of October though, so that we don't have to worry about the pipes freezing when the weather turns.  Cross your fingers we get it done uneventfully!

Jul 30, 2013

Trap Door

We've been in an uncannily long stretch of glorious sunny weather in Western Washington.  It's enough to make me want to paint something.  Well, two somethings.  Our exterior doors- the front one and the one leading into our backyard.

Normally I'm not one to put off low-effort, high-impact painting projects.  But there were a couple of reasons I have waited so long to paint our exterior doors.  First, neither of our doors are in great shape.  They've got at least half a dozen dings and scrapes each.  And while I would luuuurrrrvvve to get a new, more dramatic front door (like this or this), it's just not something that's worth spending that many pennies on right now since both doors are still perfectly serviceable.  That still left me at a loss about how to deal with the dents and scrapes before putting a glossy coat of yellow on top.  Also, I've read approximately eighty-six thousand tutorials about painting steel doors, and they all promise that if you follow their instructions, you'll end up without any discernible brush marks.  Lemme tell ya, even with products like Floetrol, I still have yet to do a standout painting project where there are no visible brush marks.  Walls and trim work?  I'm good.  Vanities, cabinetry, furniture?  Not so much.  I was skeptical, and certainly didn't want to waste a ton of time (and paint!) trying to get my front door looking like it was painted by a professional if it could not be done by myself and a paintbrush.

Things changed when I discovered that auto body filler can be used to patch dings in steel doors.  And when I ran into Lowe's for some sanding blocks and discovered that Lowe's carries auto body filler in the same aisle as their wood filler and spackle and texture, I decided to just go for it.


Wrinkle cream for cars and steel doors.

Although I did opt to try it on the door that leads to our side yard rather than our front door first.  I figured if I messed up the back door, Steve and I would be the only ones who would ever have to look at it anyway.  I followed the directions on the can to prep the door and mix the filler, applied it with a putty knife, waited several hours, and the sanded the heck out of the door.

Told ya there were lots of dings.

It seemed like it worked pretty well!  In fact, so much so, that I got a little overanxious to finish the project.  Waaaay back when we moved in we had considered painting our kitchen yellow, and I had a test pot of Sherwin Williams' beautiful White Raisin leftover.  I taped off the door, put a couple coats of primer on it, and slapped on two coats of White Raisin using a 2" brush following the order and direction of paint application I had seen on every door-painting-tutorial that exists.  Then I pulled all the tape off and admired my handiwork.

Yellow door.

Except it didn't actually happen that way.  I pulled all the tape off and realized that this yellow was much more of a sweet country yellow than I was going for.  I wanted major "pop" and next to our siding the door looked more like pee pee in the potty than sunshine on my shoulder (and just when you thought I had grown out of potty humor).  Although I still love the color White Raisin, I just didn't love it on the door.  And I realized after the fact that I didn't bother to use a type of paint that was intended for exterior surfaces, so even though I primed, the color would almost certainly fade and would probably peel at some point too.  Plus, there were VERY obvious brush marks, which I figured were from using the wrong type of paint.  Whomp, whomp.

Good thing I bought sanding blocks because I was able to put them to use sanding the door back down.

Once I admitted color defeat, I returned to my safety zone: copy someone else's color choices.  For this one, I turned to my friends imaginary friends John and Sherry.  They had painted some siding with the same color ours was- Martha Stewart's Flagstone.  And they painted their door a happy yellow- Full Sun by Eddie Bauer.  One more trip to Lowe's and I had my very own copycat color, in the correct type of paint for an exterior steel door!  I was giddy at being only a few hours away from having at least one exterior door on our house be super cute!

The right stuff.

Get a load of that yellow!

That's more like it!


And here it is after two coats.  I love how cheery it is!

Turn that frown upside down.

Although there were some things about it that I didn't love.

First, there were still visible brush strokes.  Not like crazy "in yo face" visible ones, but visible to the naked eye.  I even mixed some Floetrol in with the paint, which is a product that's designed to reduce brush strokes.  Who knows, maybe I just put too much paint on my brush at once.  I guess I was just hoping for a much more glossy and refined effect, like you'd get from a sprayer.

You can see the brush stroke texture in the reflections.

Then there was this unanticipated side effect....


Yowza!

Once the door was dry enough to close so we could see it with the siding, we realized that it was really bright.  Like day-glo bright.  Case in point- the beach towel is navy and neon green.  What's brighter than neon green?  THAT DOOR!  And although I love how it "grayed" our siding a little more, it looks terrible with our red-brown roofing (not to mention with all of that junk laying around in our backyard, but that's my fault, not the paint's fault).

So what did we learn here?

Always make sure you are using the correct type of paint for your project before you go cray-cray.

Try a baby step.  When you're taking a decorating risk, try it in a way that is less conspicuous or easy to change if you end up hating it.  Can you imagine if I had done the front door first?!  We'd have to give every guest and FedEx guy who came to our house complimentary sunglasses.

Take a friggin' risk!  Although it didn't pan out for me this time, I would have been sad forever about my lack of yellow doors if I hadn't given it a shot.

Trust your gut.  I was suspicious about painting with a brush and ending up with no brush marks, and it's because I just cannot make that happen.  If you want your paint to look really smooth and glossy- use a sprayer, not a brush.  No cuts, buts, or coconuts.  (Did you forget I work in public school?)


So we're living with the back door as is until we can borrow my Dad's sprayer and find a different color that is still cheery but not cheerleader-on-uppers and blends well with both our siding and our odd-toned roofing.  Make me feel better.  Have you ever made a color choice that went horribly wrong?

Jul 11, 2013

Garage Progress

I've finished painting!  Since I applied the paint directly to drywall, I ended up using about 2 gallons- that stuff sucks paint right up.  Just as a reminder, here's where we started:

To the right.

To the left.

You can see how I started with our interior paint, Kilim Beige, around the doorway.  Frankly, it just wasn't covering well enough.  And here's where we're at now thanks to our leftover exterior paint.


More left.

More right.

The paint really helped things look cleaner and less cluttered.  We are still debating about paining the ceiling. We think it would look nice, but we all know that painting ceilings is not a party.  Jury's still out.

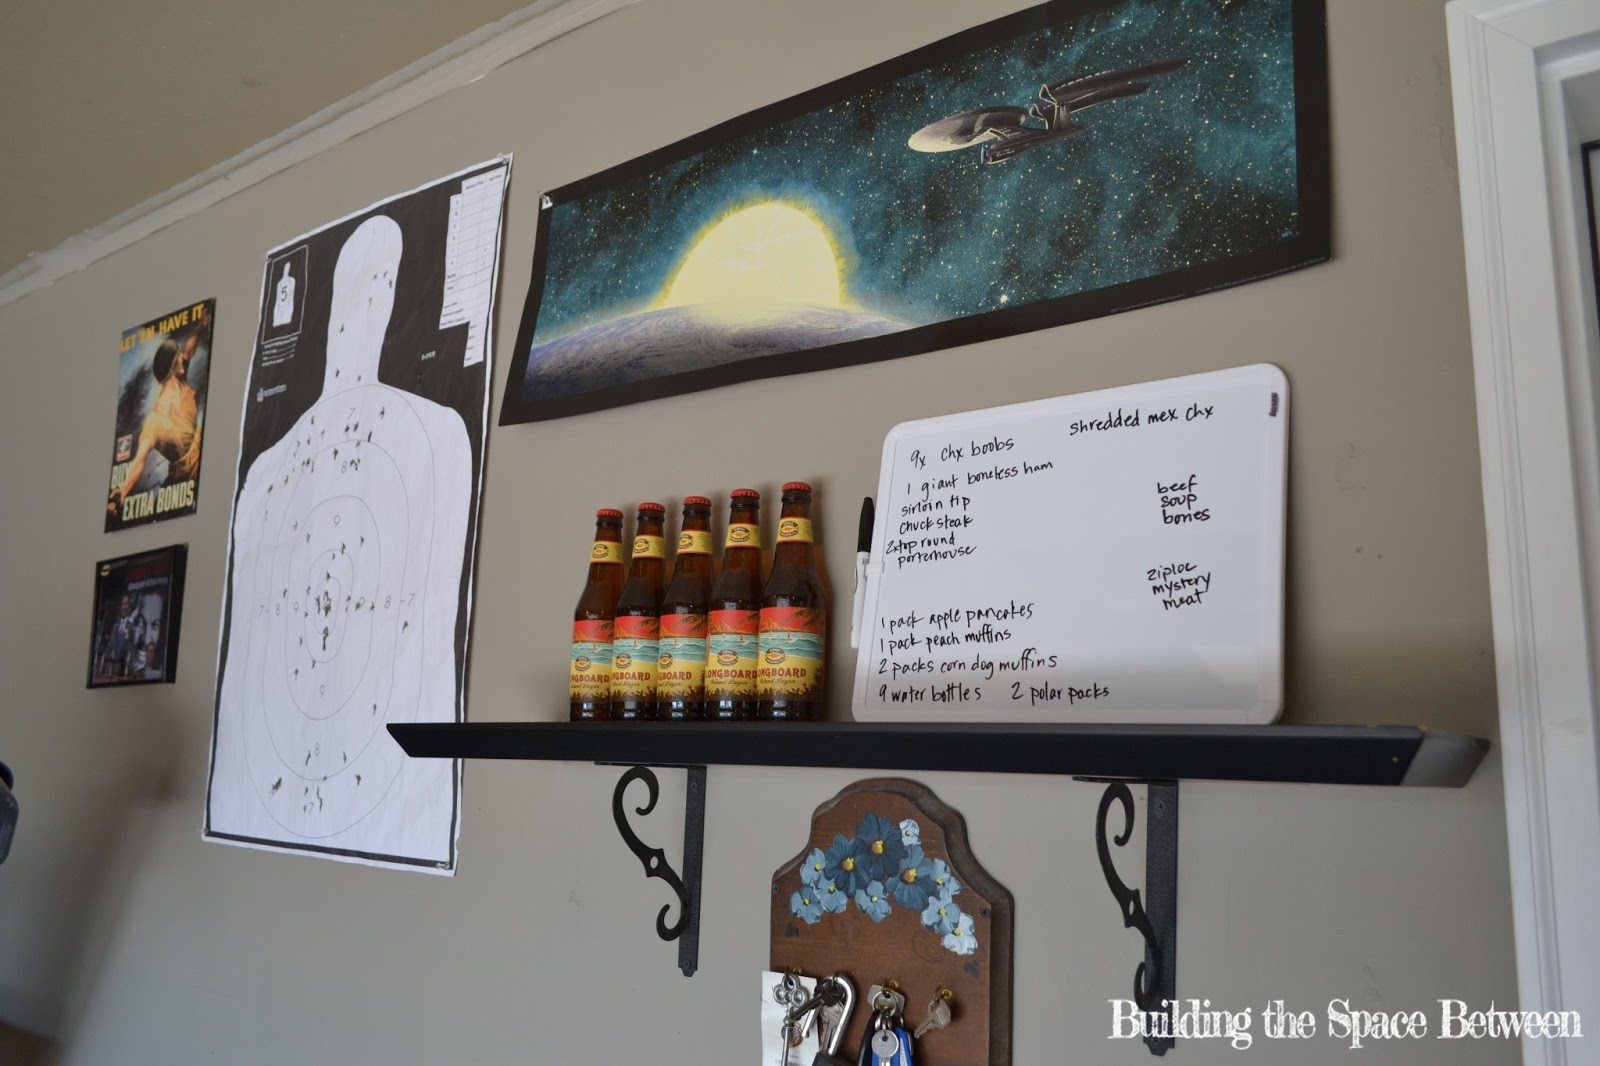
Here's the wall to the left of the door.  We moved the key hooks down so we could put up a shelf and some artwork.  In the spirit of the garage as "man domain," most of what's on the wall are pieces of memorabilia of Steve's.


Nerd alert.

My favorite part of this wall is the whiteboard on the shelf.  Our chest freezer is notoriously disorganized and I hate digging through it when meal planning, especially in winter when it's chilly in the garage.  I took the time to inventory the chest freezer and wrote it on the whiteboard.  This way, I can keep track of what's in there without rummaging around a bunch of meats by simply adding and deleting items from the whiteboard as they go in and out of the freezer.

Every freezer has some mystery meat, right?

Aside from some garden tools that had been hanging out by our water heater moving to the garden shed, this little corner got some much needed organization too.  Our exercise mats are now neatly rolled up and on the shelf with the Xbox (which we love for playing exercise videos or streaming Netflix while treadmilling).  My weenie weights hold the mats in place.  We have plans to build a small shelf below for heavier weights and kettlebells, and Steve's heavybag will get stashed there too, so all of our exercise equipment is in one spot.

Exercise center.

The front end of the garage is coming right along.  So what do you think about the ceiling?  Paint or no paint?

Psst- check out this post at Beneath My Heart's "Best DIY Projects of July" Linky Party!

Jul 8, 2013

Cover-Up

Kenny is the BOSS, Princess Hayley, Angel, Oh ya!

What does it all mean?  I'm not sure.  I am sure that I don't want to read these phrases scrawled on the inside of our garage in sidewalk chalk and spray paint anymore.  And the best way to do that is a little cover up mission.  I recruited Martha Stewart to help me.  Or her Flagstone paint, to be exact.

Buh-bye, Princess Hayley.

We had about seven gallons of Matha Stewart's Flagstone exterior paint after using it as the base paint for our house last summer.  I figured, why not?  It's a little dark for a place that is already kind of dark, but it's free, and we had a TON of the stuff.

I decided to paint the entire finished section of wall, which includes the wall closest to the interior of our house and about four feet's worth of drywall on either side of that.  And I figured I'd add some organization and pizzazz so long as I was classing the joint up.  More on that later.  Here's how we looked after just adding the paint and a shelf that had been gathering dust in the corner for the last almost two years (don't judge).


Delightfully scribble-free.

Is there still work to be done?  Oh yes.  See: laundry basket full of shoes, half-empty box of wine in front of chest freezer, and lack of photos showing the whole finished wall for reference.  But I've already gotten to work on it.  And you'll get to see it soon.  I promise.  Spoiler alert- the finished wall may or may not include Star Trek memorabilia.


Jun 17, 2013

Club Shed

A garden shed has been on our exterior "to do" list since we moved in.  We originally thought we'd end up with a lean-to type of shed against the garage because all of the large, nice looking ones that we priced (even ones from a kit!) rang in between $700 and $3,000.  So we had resigned ourselves to something smaller, even though we didn't care for the look of lean-to sheds.  But right around Easter, Woot! offered a metal 10' x 12' storage shed by Arrow for less than $400.  We checked out some reviews online, found we wouldn't be able to beat the price, and pulled the trigger.  The shed was delivered about two weeks later, boxed up and ready to assemble, and it's been languishing on our front porch since then.

But no more!  Steve and I finally had a weekend to ourselves so we decided to reclaim our front porch and get that freakin' shed up so we could actually use the thing.  I have to admit, this was not as easy of a project as we anticipated.  But the good news is (spoiler alert) we got 'er done!

The first thing we had to do was some site prep.  The previous owners had a large amount of chip bark where we decided to put the shed at the very far west end of our yard.  Since we planned on landscaping around our shed, the bark had to go.  Four weekends worth of raking and shoveling bark chips later... we pulled up the beams the previous owners had set into the ground to separate the chips from the weeds, er, yard.

Bark raked, one beam left to haul away.

Next we had to build a foundation for the shed.  This part was not included in the kit, and by the time we were done, the foundation and flooring materials set us back about $300 (although I think we'll be able to return about $50 worth of unused materials).  We hauled all of the foundation goodies into the backyard and Steve started digging away.

It has begun.

It was at this point that we ran into two major issues.  First of all, the yard is sloped.  We always knew it was sloped, but we didn't realize it was THAT sloped.  Especially at the far west edge of the yard.  Figures.  And second, we realized that like much of the landscaping work on our property, things were done slap-dash.  For instance, a few inches of soil and sod resting comfortably atop who-knows-how-deep 3/8- gravel.

Bring on the pick axe!

Nevertheless, we managed to construct a frame.  And by we, I mean Steve did pretty much all of the work and I helped hold the beams in place while Steve nailed them.

Looks like a construction site.

I'll spare you a shot of Steve looking super tired after digging out gravel with a pickaxe and laying a foundation on a hot day.  At this point we called it good for the day and rejoined the following day by laying the flooring.

Gratuitous Action Shot.

Hurrah for plywood!

One of these days these boots are gonna walk all over you.

We noticed at this point how entirely non-level our floor ended up being because of the slope of the property.  We also felt the floor was a little jouncy, so we flipped the whole thing up on its side, added some extra crossbeams for support, and laid it back down.  All of the tutorials online and even the shed assembly instructions made a big deal out of the floor needing to be square a level, but we decided to live dangerously and roll with it as-is.  After all, this is a cheap metal shed that's barely tall enough to stand up in.  We weren't building a luxury hotel.

The next day we started on the part that Steve refers to as "Legos for grown ups"-- assembly.

Better for your brain than Sudoku.

This part went surprisingly easily.  We worked until we had all of the sides built and then quit for the day, not too long after this picture was taken.

Yowsa, that is a seriously non-level shed.

It took us three more days of an hour or two after work to get the roof and the doors on.  And we did end up shimming one of the corners of the shed to help the pre-drilled holes in the roof panels line up better.  But we were overall really impressed at how well this little cheap-o shed came together.

Luxury hotel, at your service.

Steve added one more layer of plywood to shore up the floor a little more, and now she's ready to roll.

Blank slate.

I've already started moving some things out of our garage and into the shed.  We agreed that anything gardening or yard care-related would live in the shed and so would all of our camping gear.  Steve would like to store some of our seasonal decorations out there too,  but I convinced him to wait until we've had a few heavy rains just to make sure we don't have any issues with leaks (nobody likes a moldy Christmas tree).  We also think there will be shelves out there eventually to help keep things a little more organized, but for now it works just fine and we are one step closer to having our garage organized enough that Steve and I can both park in it again!


Gardening and lawn care stuff.

Camp chairs, lawn care stuff, and a generator.

Have any tips for me about organizing this space?

Click here to follow my blog on Bloglovin!

Mar 19, 2013

Garage: Move In to Present

I've managed to give a tour every area in this house except the one that Steve describes as "man territory."  That's right, the garage.  In our last house, we turned the garage into a sunken room which eventually became a nightmarish pit of moldy storage (a burst hot water tank will do that).  Our cars were relegated to the drive pad.  Once we moved into this house, I told Steve and I wanted both of us to be able to park in the garage.  This was especially important to me since we live in the downtown area of our rural community and most of the crime that happens here is vandalism or petty theft (read: bored teenagers).  I have had the lovely experience of running late for work only to discover your car window has been broken out and the contents of your car are in disarray or missing at previous residences, and I have no desire to repeat it here.  These photos were taken on a day when the garage was serving its alternate purpose- workshop for Steve- so the cars were parked outside.

Let's start with the view walking from the house into the garage.


Busy bee.

Fortunately, this house had a garage door that was still in usable condition when we moved in.  Unfortunately, it had no garage door opener.  Or rather, it did at one time but didn't any longer.  Getting the garage door opener installed was one of the first things we did after buying the house.  Steve also put up the two sets of long fluorescent lights (leftovers we got for free from his parents).  If you look closely, you can see that we use the rafters for storage.  We've got the two wrecked black screens for our sliding doors up there (we saved them because they're nonstandard size so we want to have them matched), the indoor/outdoor rug that used to be in our living room (we know we'll eventually have a place to put it again), the box spring from our mattress (I am still incredulous that Steve managed to get that thing up there), and a snow shovel.

Down the left side of the garage, we tried to maximize storage.  There were no shelves out here when we moved in; Steve built them all himself.

Holy hoarders, Batman.

I know it looks like a ton of stuff (and it is!) but believe it or not, it's pretty well categorized.  Closest to the garage door is holiday stuff and car stuff, in the middle there's camping supplies and dog supplies (including a large dog crate that opens toward the doggy door), and closest to the side yard is painting supplies and lawn care/gardening stuff.  You can also see the first coat of stain on one of my planters right front and center.  Hee!  This is part of the reason why we are planning on adding a lean-to style garden shed in our back yard. About five feet of linear shelf space can be moved out to the "garden shed," meaning we'd have more room to organize what's already here.  The small cement patio is right outside that door.  You can see the basketball hoop on our neighbor's back patio.  I'm just thankful we can see anything at all- that window was so crusted over with gunk when we moved in that it took three separate encounters with a soapy green scouring pad and a hose to make it clear again.  Eventually I'd like to put some trim around the door too.  I know it won't serve any real purpose since most of our garage isn't insulated, but it'll gross me out less than looking at the cobwebs in the gap between the frame and the drywall.

And speaking of places in our garage that accumulate cobwebs- here's our hot water tank and furnace system.  We actually manage to store most of our long-handled tools around our water heater, which works pretty well for us.  Steve hung a row of hooks right next to the door out to the yard to hang out extension cords on.  I have to tell you, this was the BEST thing we have done in organizing this garage so far.  It's so easy to see which length cord you're grabbing, and we have wayyy less issues with tangling than we did before.  Plus, it's right on the way out to the yard.  You can grab the extension cord you need while holding the string trimmer in your other hand, and then all you have to do is plug it in and string trim to your heart's content.  The rug that used to be in our entry is also here.  It's the perfect spot for it- it's cute, plus it's large and nubbly enough to get most of the wet and dirt off shoes and paws as we come in and out.  We have a basket full of dirty/yard shoes at the entrance to the house so we can easily find those stained-green old sneakers when we go to mow the lawn without having to trip over them incessantly.  And we've got a small chest freezer where our frozen meat lives, hidden by some boards Steve was using for a project that day.  I love that I don't have to sacrifice freezer space in my kitchen, and it's really easy to pop out to the garage and grab the meat we'll need for the next day or two.  I don't even have to walk on the cement; I can stand right on the rug and do it.  You may notice something weird with the color around the door into the house....

Identity crisis?

It's paint.  The same paint we used for the bulk of our home's interior.  Remember when I talked about painting the door black?  Yeah, still want to do that.  And then I shared this inspiration pic?

{via}


Yeah, still want to do that, too.  I actually got impatient once the new door was installed and decided to start paining the drywall to make things look a little cleaner.  I just patched some of the holes in the wall (who knows what they were from) and went to town.  There were also a lot of strange messages written in chalk and spray paint along this wall, not  to mention dinosaur stickers, so painting is helping things look less unkempt out in the garage.  See?


Apparently someone was queen.  Their reign is being endedby Sherwin Williams' Kilim Beige.

Here's the rest of the wall closest to the house.  This is what we refer to as our exercise center.


Let me get a little Clueless on you:  Exercise?  AS IF.

In addition to the treadmill (Steve's sweatshirt and a bag of talc powder are hanging off it), we keep our yoga mats, kettlebells, and Steve's heavybag out here.  Steve also had the genius idea of hooking up his older Xbox and a cheap TV out there so we can watch Netflix while we treadmill or use exercise videos if we want.  Our old door is hanging out waiting to be taken to the Habitat for Humanity store, and Steve's most recent target practice victim is on display.  Having been in the Army, he loves to shoot and he's a really good at it.  I joke that hanging this in the garage was a great way to deter potential thieves who may peer in through the side yard door.

The north wall of our garage is Steve's makeshift shop.  We already know that someday when we move, our next house will need a shop or a place to build one.  When the cars are pulled in, all of Steve's tools and equipment and pushed tightly against this wall (we keep a piece of cardboard over the legs of the band saw so I don't ding my door when I get in and out).  And obviously, things get pulled away from the wall when Steve's using them.

Man time.

His work bench is recently installed from an old tabletop used at his office.  We use a dresser and his tool chest for organizing smaller tools (although I use the term "organizing" loosely since I can't ever find what I need out there).  And surprise- more stained windowboxes drying on cardboard!

It totally looks a mess to me, but Steve is very accommodating as far as me doing the bulk of our home's organization and decorating, so I try to let him do what he wants (mostly) with this space.  And obviously he has a good time out there.


Gratuitous manly action shot.

 Does anyone have some good garage organization tips for us?  How do you organize a multi-function garage (shop, exercise, storage, lawn care)?