Pages

Dec 30, 2013

Walling In

FYI, holidays and guest bathroom renos don't mix.  Don't get me wrong, our company over the holidays has been very accommodating about the state of the bathroom (THANK YOU!!), but it sure has slowed us down having what feels like a non-stop cycle of parties, shopping, and overnight guests for the past few weeks!

But, we do have progress to report!

Near the beginning of the month, we managed to get the tub in and one wall of greenboard up.

So satisfying to see a tub there!

Then up went the greenboard over the rest of the exposed studs.  Luckily, Steve is a master at joining drywall cleanly.  I credit his brief stint working construction in the mid-2000s and his OCD about exacting measurements (elementary school bulletin boards will never be his thing but he can hang pictures and drywall like nobody's business).  Next came the cement board along all sides of the tub.

Greenboard done and some cement board on the long edge of the tub.

We hemmed and hawed about how far long the lip of the tub we wanted the cement board to run, since that's what the tile will be adhered to.  Did we want it just to the outside edges of the tub?  Did we want to run it a little further out than the tub?  Maybe down to the floor for a little extra tile detail?  In the end we decided that flush with the edge of the tub would give us a cleaner look for such a small bathroom (and save us a teeny bit of cash on tile).

Cement board installed!

The only obstacle left was what to do about the "outie" pipe.  Remember, this one?

Face palm.

Steve cut notches to allow for it in the greenboard and cement board, but that still didn't solve the problem of how to keep that pipe (and our drywall!) protected from getting banged up or wet.


Extreme outie.

After lots of discussion, we decided it would be best to build a small alcove around it; something that we'd tile over just like the rest of the cement board, something that would make a handy place to stash something like a bottle of shampoo when you're showering.  So here's what Steve came up with.


Outie be gone!

Our hope is that it will look like a design decision once everything's tiled... instead of a weird little bump-out meant to protect an improperly jointed pipe.  :)

Looks like we did it on purpose, right??

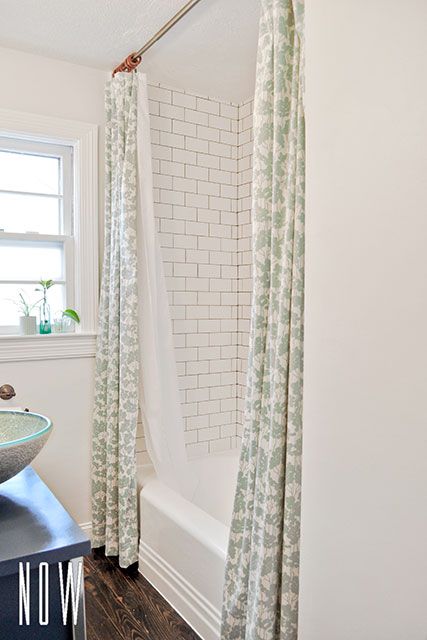
Pretty nice handiwork on Steve's part!  I am so excited because this means...  we are finally ready to start tiling!!

Protected and ready for some bling!

Our plan is to take the faucet kit you see languishing in the tub as well as some extra "just in case" cement board back to the hardware store and pick up our tile and tiling supplies on New Year's Day.  Apparently trying my hand at tiling sounds like a fun way to spend my birthday.  :)  Crossing my fingers I'll have some pictures to share late this week of our progress!

Just got here?  Catch up on the whole she-bang by following the links below:

(1) Getting estimates and why we decided to DIY
(2) Demoing the old acrylic tub and surround
(3) Phase One of getting the new tub in place
(4) Phase Two of getting the new tub in place

Dec 6, 2013

Tub Thumping (Again)

So.  The greenboard's up.  The stringer's up.  What next?  Well, taking the toilet out is what's next.

Toilet's gotta go.

Just for fun, here's what the opposite end of our bathroom looked like once the toilet came out.

Keeping it classy.

Next up?  Bring in the tub and fit it into place.  Except we ran into a few hiccups.  First we realized that the only way the tub was going to get in was if we squared the tub up, laid it on the floor, and slid it into place.  Our difficulty here was with mathematics.  We originally thought we could bring the tub in, set it on an end, and swing it down onto the floor.  But after we tried it, our brains fuzzily recalled Algebra class and all of that Pythagorean Theorem junk and we realized that math meant swinging the tub down from an end just wouldn't work in our just-wide-enough-for-a-tub bathroom.  Which meant we had to remove more drywall and some trim around the door in order for the tub to sit flush on the floor.  Then we were able to get the tub in!  Except that we ran into our next hiccup: the stringer was hung too high.  We realized this was just a goof on our parts, but we had to pull the tub part way back out to move the stringer lower.  Once the stringer was moved to the proper height, we slid the tub back in, only to realize the overflow and drain pipe from our old surround did not fit the new tub.  So our tub spent a night like this, until we could go get a new drain and overflow and get back to it.

The hazards of Do-It-Yourself.

After a trip to Lowe's, I managed to catch this great photo opp of the drain (oh, and Steve) once we knew the new drain would fit.

CHEESE!

Steve then removed the drain from the floor and attached it to the tub, and we slid the tub in yet again.

YESS!!!

Finally!  The tub fit, the drain was attached, and we were totally exhausted from moving that dang tub in and out so much.

By the way, we are feeling very fortunate to have purchased an Americast tub from American Standard.  It's much quieter than the super-cheap enameled steel models we looked at, and about a third the weight of the lightest cast iron tub we looked at.  So although it wasn't a total snap to move the tub in and out of place so many times, it definitely could have been worse (and heavier and louder).  Plus it's supposed to hold heat really well- bonus.

Next up will be cement board and drywall, but until then we're giving Steve's arms a break and letting all of our patience stores refill.

Just dropped by?  You can catch up on the whole story here:

Getting estimates and why we decided to DIY
Demoing the old acrylic tub and surround
Phase One of getting the new tub in place

Dec 4, 2013

Tub Thumping

Yes, that is a throwback to this terrible song from Chumbawamba.  Seriously, what were we thinking??


When we last talked, we had a big gaping hole in our guest bathroom where the cracked acrylic tub/shower surround one was.

With a Steve getting the dust out with a Shop Vac.

Since then, we've made an even bigger mess, but we are moving forward with this project!!  Our first step was to insulate the pipe that provides water to the icemaker in our fridge.  We hoped that this would minimize mold regrowth, since it appears that condensation on this pipe may have contributed to the mold we found when we took out the tub/shower.

When I say "we" insulated the pipe, obviously I mean Steve insulated the pipe.

Next came batt insulation, to cut down on noise coming from the bathroom to our hallway and kitchen.  We were very happy to come by this for free- my parents had an extra roll stored in their barn that they donated to us.  Once all the insulation was in, we installed greenboard drywall.  Normally we would have just plunked the tub in, but because of the odd dimensions of the surround we removed, our tub was about half an inch narrower than the space between where our vinyl flooring ended and the far wall.  The greenboard is meant for damp areas (like bathrooms), so we used that to add the half inch thickness we needed for the tub to be secured against the studs without leaving a big gap between the outer tub edge and our vinyl flooring.

Steve and this framing hammer have grown very close over the last week or so.

We knew we'd run into one area of difficulty with the greenboard, courtesy of whoever plumbed this joint:

Yes, that's an outie.

Obviously the plumber wasn't very well versed in belly buttons.  The studs clearly allow for an innie, but this joint is an outie.  Steve cut away a small section of greenboard, and then used this tricky contraption to lever it up and into place so he could nail it to the studs without disturbing the outie pipe joint while I stood around and took pictures.

GENIUS.

Once he was done installing the greenboard, up went the stringer for the long edge of the tub to rest on, and then we were done for the night.

Strung.  Oh, and see the joint sticking out of the notch in the greenboard?

All that work and there's not even a tub in there yet!!  This is always the point at which I wonder to myself "What have we done??" so I'm trying to remind myself that it gets worse before it gets better.  And remind myself about why we chose to DIY this project in the first place.

Nov 24, 2013

Burning Feathers

Make that burning fiberglass (Arnold says, "It's not a tooomah.").  Steve has been very busy with power tools and respirators and frequent showers lately, because he's been demoing our guest bathroom tub, surround, and the drywall around it.

The setup.

I feel bad on projects like these because we only have one respirator, and the bathroom's not really big enough to accommodate 2 people, so Steve had to do pretty much all of this part of our bathroom reno.  My job was to document/stay out of the way.

Steve prepped by removing all of the fixtures and the shower curtain rod.

Fixtures off!

What followed was 15 minutes of terrifying noises coming from this bathroom.  Once the dust settled, I snapped this shot of Steve's progress.

Upper drywall?  See ya.

The next time Steve went into that bathroom, there was the smell of burning acrlyic that accompanied the terrifying noises.  Although Steve had a respirator on, the door closed, and the fan running, this bathroom is in the middle of our house.  Of course once I realized I was smelling acrylic dust, I ran around our house turning on every fan we own and opening all the windows.  Once Steve's dremel saw max blade was too dull to continue cutting, we took the pieces of the tub surround out to the garage.  After a couple of hours, the dust had settled enough that I could peek in the bathroom.

Almost out!

At this point, we could see the finish line.  Unfortunately, our fears about running into mold were gaining strength.  See the left hand size of the exposed drywall?

Suspicious.

I peeked between the studs.  Sure enough, it was mold.

Yuck!

Fortunately, the mold didn't look to be toxic black mold, and after doing a considerable amount of research, we decided we'd be able to kill the mold we could see here easily enough ourselves rather than having to call in a mold remediation specialist to the tune of $700 and up.  At this point, we still couldn't see under the tub itself, which is where we were the most worried about seeing water damage and even more mold.

A few days later, Steve was able to pull the tub out with help from his dad (thanks, Dennis!) and I was so relieved to poke my head into the bathroom and see this.


No black mold!!

There had obviously been some water seeping between the walls before, but we are reasonably sure that all of the mold on the drywall and water damage on the floor was from an isolated event involving the water connection for our fridge long before we moved in and condensation on the pipe.  We were able to clean the mold from the drywall as best we could, and sprayed a tea tree oil and water mixture on it to inhibit regrowth, and we're pretty sure that between that and insulating the pipe before we start putting the new tub in, we shouldn't have to worry about mold in the future.

Dodged a bullet!

The full demo process took us just over a week, which includes time to let battery-operated power tools recharge, get a replacement dremel saw blade, wait for Steve's dad to be over for a visit to finish pulling the tub out, and let the dust settle and get shopvac-ed out several times.

We're finally on our way to having a leak-free (and pretty) new tub and shower surround!

Why did we demo the bathtub since we had already finished sprucing this bathroom up?  Catch up on the back-story here.

Oct 29, 2013

Guestimates

Let's get something out of the way:  During the school year, my normal summer 1-3 posts per week becomes 1-3 posts per month.  Drives me nuts.  So I have decided that rather than blast out a bunch of posts during the summer and then dry up during the school year, I'm going to save the blog for the stuff I'm really proud of.  The major projects.  The big-impact posts.  The big potatoes.

This is the beginning of a big potato story.

Our ugly chipped fiberglass guest bathtub has bit the big one.  A large crack running most of the length of the shower pan was the nail in the coffin.  Honestly, getting this tub replaced wasn't really on our radar until recently.  We thought maybe we'd get around to doing something about it eventually, but there were so many other more pressing functional upgrades that needed to happen around our house that replacing this tub fit more in the "maybe in a few years, if ever" category.  But since we've been hosting overnight guests more and more frequently since last winter, it's been bumped to the top of the list because a) our overnight guests deserve to be able to de-stinkify themselves and b) we are really not keen on the idea of our tub leaking and causing water damage to our house.

We called some local plumbing/reno folks for estimates on replacing the tub and surround.  After four estimates ranging from $1300 to $2700 (!!!) for just removing the tub, replacing it with another fiberglass tub and surround, and reconnecting the plumbing (finishing the drywall wasn't even included!), we decided this would be a project worth DIYing.

The good news is, we're going to be able to do this MUCH more cheaply ourselves and with higher quality materials... unless we run into nasty surprises like extensive water damage-- knock on wood.  The bad news is that it will take a lot longer.  We are still in the hunting/gathering phase of this project, so there are many aspects that we're still piecing together, but we are trying to cheaply source a cast iron tub and white subway tile.  I think we may have found the tub in question (on Craigslist, of course), and hopefully a trip to the local Habitat for Humanity store will yield some tile options.  In the mean time, please bear with me on the blog post dry spell, check out the inspiration photos we're using, and if you know anyone that would be willing to lend us a wet saw or Rubi cutter- hook us up!

{via}
{via}
{via}

Sep 23, 2013

Shoe Shrine

I have an awkward confession.  I have big feet.  Like, really big for a gal who tops out at 5'7".  I  wear an 11.   And, being a girl, I harbor a deep abiding love for cute shoes.  This has led me to be a compulsive shoe buyer.  I hunt religiously for 11s.  If I see them in a cute style, and I try on that style, and if (miracle of miracles) they fit and are comfortable and don't make my feet look like boats, I buy them.  End of story.

Well, almost.  It's gotten to a point where it's become difficult to wrangle so many pairs of cute shoes.  Especially now at the tail end of summer, where every pair I own that's not boots gets a little action.  It's not like wintertime when all of my sandals get tucked up for the season and I have tons of closet space for my little closed-toe pretties (#firstworldproblems).

I have a point, I promise.  About a month ago, Nine West had an amazing sale.  They pretty much never stock 11s, but I love to browse anyway.  So back in the clearance section, I found a pair of amazing coral flats.  In 11.  And way comfortable.  And $14.  IKNOWRIGHT!?!  And wouldn't you know they had a pair of navy patent flats right next to it.  And then I found a pair of oxblood pointy toe flats in suede with the cutest buckle detail.  People, you know I bought all three pairs of shoes.

Here comes the point:  I got home and realized that I didn't have any room for my new shoes.  I tried rearranging to no avail.

Hanging shoe rack, wire shoe rack, and floor: full.

I shopped the house and thought the ladder bookshelf that lives in our dining room (right where that buffet that Steve told me he'd make will live one day) might be the solution to my issue.

The photo's bad, but at least I restrained myself long enough to take one!

Nope.  It was cute, and I liked that my shoes looked like they were on display instead of just shoved in some cubbies, but I still didn't quite have enough room.

Steve brainstormed a fancy shelving system that he could build me.  We estimated it'd cost about $150.  Large enough for more pairs of shoes than I own, and with customizable cubbies.  Sounds cool right?  No matter how cool  it would be, I just couldn't justify spending $150 to make a thing to hold the things that I'd just spent money on at Nine West.

So I canvassed the garage, found two extra shelving brackets, some of the same MDF that Steve used to support the shelves he built in our office closet and kitchen pantry, and two leftover planks of the nice primed/edged shelving material.  Steve whipped the shelves up in about 45 minutes, and I followed behind patching the screw holes and putting a couple coats of white semi-gloss paint on everything to make it look clean and uniform.

Ready to roll!

And while we were working on a better way to organize my shoes, we found a better way to organize Steve's, too.  He inherited the tall wire rack that I used to use, and his slim press-board cubby fit perfectly under the bottom shoe shelf on my side to give an extra layer of storage for my flat sandals and tennis shoes.  Check out how my shoes live now!

SO MUCH SHOES!

I love that I am able to keep everything organized.  Flats get the top row.  Heels get the middle row.  Seasonal and athletic shoes get the floor.  It's so easy to see everything.  I never "lose" a pair of flats because there's nowhere for them to hide anymore.  Since they're organized by style and color, I get the thrill of feeling like I'm shopping every time I go to pick out my shoes for the day (or pick an outfit to match the shoes I want to wear).  It's also forcing me to keep my shoes neat.  Why would I kick my shoes off in the closet when I can display them so prettily?  Here's the thing that really kills me about these shelves, too.  My closet is the exact same size it has always been, but I GAINED closet space.  I can hang more items because I no longer have a hanging shoe rack, and I am fully utilizing the bottom portion of my closet.

LOOK AT ALL THOSE SHOES!

Here's how Steve's closet looks now that he reorganized his shoes, too.

Note: the purple dress does not belong to Steve.

Makes a pretty big difference, eh?  I love that this was such an inexpensive and easy upgrade.  We had everything we needed on hand already, but even if you had to buy the brackets and boards you'd spend less than $25.  Does anyone else have clever shoe storage ideas to share?  You never know then next time I'll run across some adorable 11s that need to come live with me!

Sep 17, 2013

Post Part Two

Welp, I know it's been a month since I last posted about our post in internet land.  But really it only took two weeks of wait time, two tubes of caulk, a few cuts of cedar, and two coats of primer- we have a chunkier post!

Cedar cuts waiting for caulk and primer.

I think the balance of the post itself with the rest of the house is much better.  One problem though.  I think the head trim is too low.  It makes the post look shorter than it should, don't you think?

Lopsided?

Eventually we'd like to plank the overhang.  Remember the seepy mess that was there before we repainted last year?  Surprise, it's re-seeping through the new paint job.  And since there's so much gray going on out there, we'd like to brighten things up by painting it white, along with the trim around the ceiling.  I'm trying to decide if I should take that head trim off the post and re-caulk the top to seal it or if I should just leave it as is until we're ready to plank the overhang.

Off with the head?

What do you think?  Does it stay (for now) or does it go??

Sep 11, 2013

Touch Ups

Ok, this is not the most exciting post ever, but it is here in the interest of "keepin' it real."  Once we got our Nest thermostat installed and patched and painted the area around it, it made the rest of the hallway look a hot mess.  Our house was a foreclosure, and we're pretty sure the previous owners had a large dog (or two?  three?) that lived indoors with them.  Or who knows, maybe they just had little kids living here.  Anyway, there are lots of scrapes and gouges visible on the walls, particularly in the hallway.  We also throw bouncy toys down the hallway for the dogs.  They think this is great fun, but they tend to leave scuff marks on the wall.  The toys, not the dogs.  After successfully removing the scuff marks with a Magic Eraser, I realized that the Magic Eraser worked so well that it took the sheen off the paint.  And after a little over two years in this house, we were due for some touch ups.

I went nuts with the spackle.  And then I went even more nuts with a sanding block.  And then it sat like this for a few days over a week.

Patchy.

Patchy x2.

Then things got really wacky.  The crown in our bedroom has settled a little, and some of the nail holes and the breaks between the sticks of crown were becoming quite noticeable.  So I figured as long as I had the straight-jacket spackle and sanding block out....

Cracks ahoy!

Yikes.


Fast forward a few days and things are looking nice and fresh!

Makes the door look messy!

So fresh and so clean clean.

Where'd the crack go?

It's amazing how much more "put together" our house looks just because we addressed some small details.  Our hallway looks clean and bright again and our bedroom looks like someone who cares lives there- even when there's laundry piled on top of the bed (hee!).

What are some of your favorite little details that make a big impact?

Sep 9, 2013

Nesting

If you're on prego watch (I'm looking at you, Mom), then I'm sorry for the misleading post title.  I'm not talking pregnancy, I'm talking thermostats.

Ye Olde Honeywell.

Have you guys heard of Nest?  It's a fully programmable thermostat that learns from your habits, uses wifi to check forecasts in your area, and can be monitored and adjusted by an app on your phone.  We've heard many people talking about the convenience of Nest (too cold in the morning?  turn on the heat with your phone from bed.) and the energy- and money-saving benefits.  Yes, it's a pricey investment at $250, but we did the math and we estimate that we'll have recouped the cost through savings on our heating and cooling bills within a year.  And obviously it's a cool techy-gadget, so it was only a matter of time before Steve wanted to bring one home.

Set up and install was crazy easy.

It came with a screwdriver and stickers for labeling wires.

All connected!

It's designed by Apple expats, so the whole process was really intuitive.

Smart.

The design is sleek, and the display only "wakes up" when it senses you standing in front of it.  And obviously it's much smaller than our old thermostat.

Profile comparison.

Footprint comparison.

The most time consuming part of the whole process was removing the anchors from our old thermostat, patching the wall, and painting over the bare spot.

The wall's (almost) good as new.

We've had Nest for about two weeks now, and it's still following the schedule we gave it.  From everything we've read, it'll continue to follow our lead for another week, and then it'll start adjusting to our weather and habits without us having to change the programming.

Do any of you have experience with Nest?  What are your thoughts?