Pages

Showing posts with label Life Hacks. Show all posts

Jul 15, 2014

Guest Bathroom Reno: Episode 461

I cannot believe that we started our guest bathroom reno last NOVEMBER and are still not quite done.

Yes, the tub and shower are done, and that was what we originally were aiming for.  And we really like how our subway tile surround turned out.  Now we're mostly into improving the aesthetics, since we know this bathroom will now be a place used heavily by Mr. Baby and his needs.

Since the last update, a few things have happened.  I repainted the ceiling the same color as Mr. Baby's room- Gray Owl by Benjamin Moore.  Steve has begun trimming out the room and we've got floor-to-ceiling bead board on one-and-a-half walls.  I've caulked and painted the bead board that's already finished.  All of these things were planned.

So fresh and so clean clean.

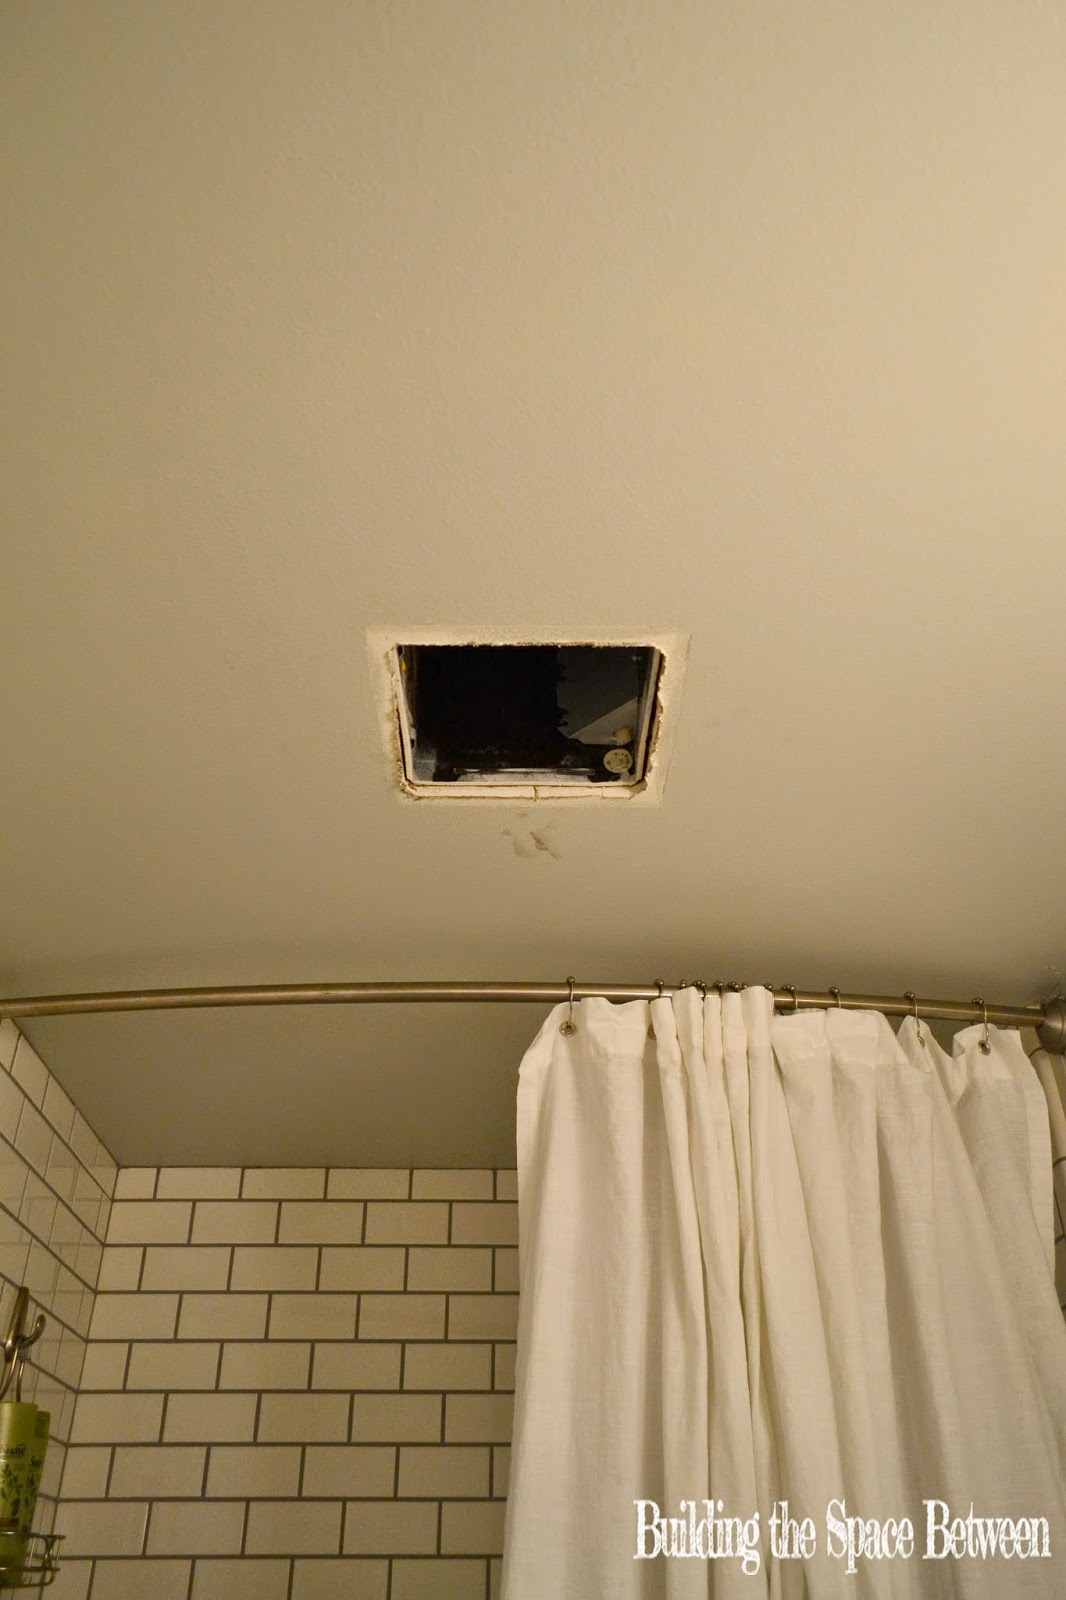
We did make two unplanned improvements as well.  After helping my parents install some new toilets a few months ago, we decided to upgrade our toilet too.  Costco had awesome toilets, so we sprung for those.  The new toilet is chair-height, which means it'll be easier for our less-agile family members (which includes me at the moment!!) to get on and off the toilet easily.  It's also one piece (easy installation and cleaning), low-flow (our old toilets were not), less prone to clogging, and quiet.  Plus the sale price at Costco was about $400 less than the particular brand of toilet normally costs.  Our other unplanned improvement is still in progress.  The motor in the bathroom fan gave out.  Since the fan is loud, difficult to operate (it's on a timer switch), and moves less air than is necessary in a bathroom that size, we decided to purchase a new high-capacity fan that's much quieter, and change out the timer switch to a regular on/off switch.  Unfortunately, installing the fan will require Steve to crawl through our ceiling, so we've been waiting for Steve to finish his boss' desk and for the weather to give us a nice cool day so that he doesn't roast up there.

Less than fan-tastic.  Har!

All the rest of the updates are fun aesthetic updates that are bumping up the color factor in this room, coordinating a little better with Mr. Baby's room, and better serving the functional needs of a bathroom that will soon be used mostly by a little boy, sometimes by visitors, and occasionally for overnight guests.  I painted our mirror frame the same blue that I used on Mr. Baby's chest of drawers- Twilight Chimes by Behr.  The rugs, towels, and new soap dispenser all came from Target (which I managed to purchase on sale- yeah!).

Hello, nasty unfinished wall!

My favorite update though, was the trickiest one for me- the shower curtain.  It was easy enough to find a shower curtain liner long enough for our shower curtain rod, which is hung just below ceiling height.  I was having a terrible time finding a fabric shower curtain that would be long enough, not look cheap and junky, be easy to wash, and let a decent amount of light through.  After searching and searching and coming up empty handed, I decided to make my own shower curtain.

DIY shower curtain.

I purchased two 96" length rod-pocket curtains from Target.  The ombre effect seemed like it might be bright enough to let in decent light, and the teal color coordinated beautifully with the bath mat.  After pre-washing the curtains, I did some math- I measured the opening of the shower and the width of the two curtains, and chose to place the grommet holes about 8" apart (the grommet holes on the liner were more like 6" apart) leaving 3" of extra fabric on each end and overlapping the two grommets where the curtains would meet.  Originally I forgot about needing to overlap the grommets, which would have left me with a gap between the two curtains right in the middle- oops.  After I carefully measured, marked, and cut holes for the grommets, I used a grommet kit from Michael's to tap the grommets into place.

Please ignore the unfinished wall bits.

I love how it turned out.  The fabric is nice and light.  The color at the bottom of the curtain is saturated and matches the bath mat really well.  I didn't have to do any sewing at all.  Best of all, this little DIY project cost less than most of the 96" shower curtains I found on the interwebs- less than $5 for a grommet kit, and two curtains from Target (also purchased on sale).  Not only that, but the height of the shower curtain makes the room look taller and roomier than it is.

From this angle the bathroom looks finished!

Pretty sure I will never buy another stock shower curtain again.  :)

Sep 9, 2013

Nesting

If you're on prego watch (I'm looking at you, Mom), then I'm sorry for the misleading post title.  I'm not talking pregnancy, I'm talking thermostats.

Ye Olde Honeywell.

Have you guys heard of Nest?  It's a fully programmable thermostat that learns from your habits, uses wifi to check forecasts in your area, and can be monitored and adjusted by an app on your phone.  We've heard many people talking about the convenience of Nest (too cold in the morning?  turn on the heat with your phone from bed.) and the energy- and money-saving benefits.  Yes, it's a pricey investment at $250, but we did the math and we estimate that we'll have recouped the cost through savings on our heating and cooling bills within a year.  And obviously it's a cool techy-gadget, so it was only a matter of time before Steve wanted to bring one home.

Set up and install was crazy easy.

It came with a screwdriver and stickers for labeling wires.

All connected!

It's designed by Apple expats, so the whole process was really intuitive.

Smart.

The design is sleek, and the display only "wakes up" when it senses you standing in front of it.  And obviously it's much smaller than our old thermostat.

Profile comparison.

Footprint comparison.

The most time consuming part of the whole process was removing the anchors from our old thermostat, patching the wall, and painting over the bare spot.

The wall's (almost) good as new.

We've had Nest for about two weeks now, and it's still following the schedule we gave it.  From everything we've read, it'll continue to follow our lead for another week, and then it'll start adjusting to our weather and habits without us having to change the programming.

Do any of you have experience with Nest?  What are your thoughts?

Aug 14, 2013

Spotted

Wayyyyyy back last July when we painted the exterior of our house, we had used a cleaning product called 30 Seconds Outdoor Cleaner to de-mildew our siding.  It did such a fabulous job of removing gunk from everything it touched.  In fact, maybe it did a little too fabulous of a job?  Check out what our front door deadbolt and handle looked like after experiencing a shower of 30 Seconds.

Spots everywhere!

When it first noticed what had happened, I thought the handle was just dusty.  Once I discovered wiping the spots didn't help, I tried a variety of soaps, wash cloths and sponges to no avail.  I admitted defeat and started planning on saving up for a new deadbolt and knob.

Fast forward 13 months.  I was watering the plants and scowling at the spots and decided to give cleaning those dang spots off the oil-rubbed bronze one last-ditch effort.  I decided to try a cleaning product that'd have some abrasive muscle behind it.  What did I have to lose?

Canned air, baking soda, and an old sock.

I got our sock- er, rag- damp on the toe, poured a little baking soda onto it, and then started scrubbing away at those spots.  I scrubbed for a good five minutes or so and then blew all the excess baking soda off with some canned air (nobody said it was just for dusting electronics!!).  Prepare to be amazed.

Second life.

No more spots!  To be fair, the oil-rubbed bronze wasn't a gorgeous lustrous finish like it was when we first bought it, but it's now over 5 years old (we brought it with us from our first house), so gorgeous lustrous finish is no longer required.  And it's going to save us from having to buy a new deadbolt/latch/knob combo, which will save us about $125.  Not to shabby for some baking soda and an old sock, eh?

Aug 7, 2013

All the (Stitch) Fixins

Fashion blogger I am not, but I am so excited about Stitch Fix that I had to write a post about it.  Stitch Fix is a "personal styling service."  They have a stylist send a package of 5 items of clothing/accessories to you whenever you decide you want it.  You  get to keep anything in your fix that you like and send back anything you don't like.

Here's how it works.  You sign up for a Fix through Stitch Fix's website.  They'll ask you all kinds of questions about yourself.  What is your height and weight?  What size tops/bottoms do you normally wear?  How are you proportioned- short/long torso, arms, legs?  You also get asked about how you feel about your body.  Are there certain aspects of your figure that you like to show off or hide?  Then you get asked questions about your fashion choices.  They have several styles that you are asked how much you like or dislike.  You can sort through collections of clothes and indicate if you like some, a lot, a few, or none of the clothes pictured.  You can also tell them if you're hoping to add a specific item to your wardrobe, if there's types or colors of clothes you don't want to receive (for example, I rarely wear skirts or dresses, so I asked not to receive those) or if you'd like to shift your style at all, and how adventurous you'd like your Stitch Fix package to be.  Lastly, you get to decide when your Stitch Fix arrives.  You can schedule a single package whenever you want or you can schedule recurring Fixes.  And you get to tell your stylist how much you'd typically spend on different types of pieces so they can attempt to operate within your typical budget.

Once you've got everything set up, you are charged a $20 deposit, called a "styling fee."  Stitch Fix will have one of their stylists hand-pick items to send to you based on your exhaustive answers to all the stuff mentioned above.  Your Fix arrives when you tell it to.  You then have three days to try on the items in your box and decide what you'd like to keep and what you'd like to return.  If you keep all five items in your fix, you get a 25% discount on every item in your fix.  If you decide to keep at least one item from your fix, your $20 styling fee gets applied to the cost of anything you want to keep.  Any items you don't want to keep?  They provide a prepaid envelope in your Fix- just put anything you don't want in the bag and drop it in the mail when your three days are up.

I got my first fix last week.  I have to say that part of the fun was the excitement of waiting for it to come.  I was curious to see what my stylist would pick for me since they give you the opportunity to link to a Pinterest board to your profile to give your stylist a flavor for what you like, and the idea of someone hand-picking pieces for me that would have a similar feel to items on my Pinterest fashion board was pretty thrilling.  The package arrived a day earlier than expected and the packaging itself was so pretty!  All five of my items were inside, along with the name of my stylist, and an inventory and price list for each item in my Fix.  Pulling items out of the package was like Christmas.  My favorite part was that each item of clothing included a card showing two different ways you could style the item.  I felt so excited to not only have someone send me things they thought I would like and would look good on me, but also give me some ideas of what I could wear with it!

So let's see the items, shall we?!

This coral crepe blouse and the blue floral necklace were in my fix.  I have to say, I loved the style of the blouse on first sight but was a little sad about the color- I didn't think coral would be a good color on me.  To my surprise, it worked!  And the fit of the blouse was PERFECT.  The neckline was flattering but not too exposing to wear to work.  The pockets and eaupulets gave it a little safari flair and the sleeves were just a tiny bit puffed to keep things feminine.  My favorite part was the bottom hem.  It was very flattering and it flowed enough to do exactly what I told my stylist I wanted- minimize my hips and tummy.  Unfortunately my posing in the photo pulled the hemline up high enough that it did exactly the opposite!  #FashionModelFail

Dog cameo.

I also loved the blue floral necklace.  I would have never thought to pair it with the coral shirt, but one of the suggestions on the style card that came with the shirt showed a necklace almost exactly like it, so I gave it a go and LOVED it.  Verdict: kept both!  Wore this outfit on a shopping date with my mom.


More dog cameos.

This purple and black stripe dolman-sleeve top was also included.  Normally dolman sleeves just bug me, but Steve thought it was really flattering.  It is a really nice weight- it feels like a light summer terry sweatshirt.  The style card showed it with jeans or tucked into a pencil skirt (I'd have never have thought to do that!) and the casual suggestion showed it with a mint scarf.  I opted for a chunky mint bracelet for easier photographing.  Verdict: kept it!  Wore this out to sushi with Tabi and Will.

Someone get this girl a camera tripod, stat.

Next was this cute patterned tank.  I loved it on sight, and the fit was right on.  I grumbled a little at the care instructions- hand wash cold, hang dry- and a little bit more at the price ($38 for a TANK??), and put it back in the box.  The next day, I tried it back on, and with a few different combinations of pants and shorts and cardis and blazers I already owned, and decided that the neckline and the pattern would make it fabulous as a shell that I could wear to work all year.  Verdict: kept!  I wore this to my friend Kalen's wedding shower.


Seriously need some photography help.

The last item in my Fix was a pair of Kut from the Kloth jeans.  I was wary.  Pants and I rarely get along.  I've got a high waist, long legs, and my hips are much wider than my waist proportionally.  And I had tried Kut jeans on at department stores before with disastrous results.  The jeans were a really dark navy wash in a slim boot cut, and unlike most Kut jeans, the back pockets were blissfully unadorned.  Much to my surprise, they fit.  LIKE A GLOVE.  They were the perfect length for me to wear with flats provided they didn't shrink in the wash (33" inseam, told ya I have long legs) and dark enough that I could wear them to work.  Even better, they had a lot of stretch and felt so comfy.  They were priced about $5 more than I've seen similar styles from Kut in department stores.  Verdict: kept!  Sorry, I don't have any pictures of the jeans because it's been in the low 80s here for the last few days and I just can't convince myself to wear them while it's so warm outside.

So if you've been keeping score, this means that I decided to keep all five items that came in my Fix, which meant that each item in my Fix would be discounted 25%.  And with my $20 prepaid styling fee, I essentially got one piece for free.  FUH.  REE.

Now, from what I understand, most people don't love everything in their first Fix as much as I did.  So when I logged back into StitchFix to let them know what I was keeping, they also asked for feedback.  How did each item fit?  How did I feel about each item- love? like? OK?  What did you think of the prices of each item?  When they asked for other comments, I asked to keep my same stylist.  I've read other stories in blog land about people getting passed from stylist to stylist with mixed results, and since I had such a positive experience the first time around, I wanted my gal, Ishara, to keep on keeping on.

Overall I am pretty darn happy about my StitchFix experience.  I had a lot of fun waiting for my Fix and discovering the items my stylist sent me.  It was fun to try things on in my own house with access to my own closet.  And I loved the little cards with styling suggestions.  I also totally rocked it in terms of getting items that I thought were cute but pushed my fashion boundaries a little, and the fit of each item was great.  And can I tell you how marvelous it is to find a pair of jeans that fit without trying on a million bazillion pairs at the mall?!  The only cons I experienced were getting sent items that included non-lazy-girl washing instructions (although I did cheat for the items marked "hand wash" and just turned them inside out and sent them through a regular cycle in a lingerie bag) and the fact that some of the items were priced at more than I'd normally pay for them if I picked them out myself.  However, because I kept all five items in my fix, the discount I scored brought the price of each item pretty close to or under what I'd budget for them if I had been looking for them at my local mall.

I'd totally recommend StitchFix if you're looking to give your wardrobe a shot in the arm, want help creating fresh ensembles when dressing, or if you just really love the anticipation leading up to Christmas (hee!).  If you want to give them a go, you can tell them I sent you by following this link.  I'd also recommend liking them on Facebook- they post great tips and some photos of items you can request in your Fixes.  If you decide to give them a try, let me know!  I'm curious to hear about your experiences with them too!

Feb 3, 2013

Wrap It Up

So I've been on an organizational kick lately.  First it was the filing system.  Then it was the fridge.  Next I decided to tackle the always Pinterest popular gift wrap organization (see the posts found on Pinterest here, here, here, and many more- search "organize gift wrap" and be lost in the possibilities for hours).

When we were first married, organizing gift wrap was a cinch.  Mostly because we didn't have any.  After our first Christmas together, we had one upright storage container for wrapping paper.  Rolls on the bottom, ribbon on top.


And for reasons no one understands, we bought more wrapping paper the following Christmas.  And then when we lived under one roof with Steve's parents, we consolidated all of our wrapping paper.  The wrapping paper was like bunnies.  Every time we left it unattended, we would find more wrapping paper we didn't know we had.  Finally our collection of wrapping paper was so large that we had to store it in two giant tupperware tubs in our garage.  And to add insult to injury, one day as Steve was leaving for work, we heard a loud pop.  Upon investigating, we found that Steve's tire had rubbed against one of the tubs, shattering a corner of it and leaving some pretty manly looking tire tread marks on the lid.  The wrapping paper was still fine, the tub was a total loss (not to mention a safety hazard).  That happened over a year ago.

We were past due for some downsizing and organizing.  And since we had just made it past another Christmas and my birthday, the time seemed ripe.  So I drug all of our wrapping materials from their nooks and crannies in the garage and dumped them all in the middle of our hallway.

We could gift wrap presents for a small army.

And just so I could get a better picture of what I was dealing with, I took off all the lids and spread everything out.

Note the jagged corner on the tub in the middle.

I was daunted.  So I decided to tackle one thing at a time.  I started with the rolls of wrap.  Anything that was still in its shrink wrap, I kept.  I also kept wrapping paper that are perennial favorites of ours, either because of how they look, or the quality... you know, the really heavy glossy stuff that cuts like a breeze.  Rolls that hadn't been used in at least a couple of years or rolls whose paper was visibly dented, crunched, or otherwise mangled got the boot.

That made dealing with the ribbon so much easier!  If it didn't coordinate with any of the wrapping paper I was saving, it got the boot too.  I will tell you, I found some mauve grosgrain ribbon in there.  The 80s called.  It wants its ribbon back.

For the gift boxes and bags, I used the same rules.  If they looked at all beat up, they didn't make the cut.  And the tissue paper!  It needed to look nearly new and coordinate with one of the gift bags I saved to stay.

By the time I was done, I had a few paper products in my recycle bin and a giant bag of boxes and ribbons and bags and wrap to donate.

Not quite as festive as Santa's bag, but it'll do.

The best part was storing everything that we were keeping.  The broken tub went out to the recycle bin.  I wanted to fit everything in our guest bedroom closet.  Fortunately, we have a half-empty dresser in the closet and it turned out to be the perfect storage solution.  One drawer is filled with gift bags, gift boxes, and tissue paper.

Peek a boo!

Another holds all of our ribbon and bows.

Shiny!

Which means now we have 8 rolls of wrapping paper hanging out in the back of our closet.  Steve has promised to rig me a system to keep them all corralled together in the closet at some point, but for now they're fine as is.

We've gained a couple of storage containers.  Our garage is less cluttered.  And it feels good to purge some of the unnecessary stuff around our home and our life.  Woo!

How do you store your wrapping paper?

Jan 26, 2013

Cold Storage

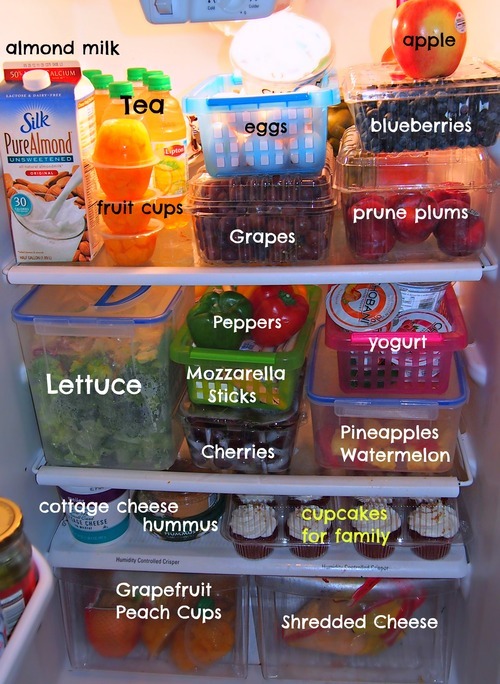
It's a new year and as usual I have a bee in my bonnet to make my life more streamlined and organized.  After tackling the paperwork situation, I stumbled upon a picture from Pinterest that blew my mind.

via Undressed Skeleton

I loved that the entire fridge was used.  And that the produce took up a large visual chunk of space and the foods that would be worse choices (hello, cupcakes) were kind of hidden.  Seems like it would be easier to make good food choices if all of the things you should be eating were directly in your line of sight when you open your fridge.  Plus everything was contained.  No random fruits lolling around.  No runaway baggies of carrot sticks forgotten in the back corner. The other part of this photo that rocked my world was the shelf placement.  This is where being a linear-sequential kind of gal gets me in trouble.  My fridge shelves have been in the exact same arrangement since we came into possession of said fridge seven years ago.  It hadn't occurred to me that the way I arranged them in 2006 may not be working for me anymore!  Facepalm.

So I decided to do something about it.  One trip to Storables for some clear bins and about an hour later, here's the fridge arrangement I came up with.


I wanted all of our produce to be as in-your-face as possible, so we'd be more likely to grab some as a snack than something naughty.  Yes, we dedicated an entire drawer for soda.  Yes, we know it is bad for us.  We're trying to remove processed carbs from our diet, but let's face it, quitting soda is rough.  They need an 1-800 "Soda Cessation" hotline that you can call.  In the meantime, we'll take our food improvements one step at a time, thank you.  (Pass me a Sprite Zero.)  We go through a TON of salsa in this house, and we always seem to have at least one open bottle of wine, so both of those got their own spot.  Same thing goes for eggs- one carton of fresh eggs and one carton of hard-boiled.  We filter our water and keep the reservoir in the fridge, which means we're more likely to choose water as a drink because it's nice and cold.  And we left a big space open next to the water.  Steve happened to have a RockStar in there from pulling an all-nighter at work when I snapped the picture, but we thought it would be good to leave us some play in case any of these areas overflowed, or if we needed to stock up for situations like holidays or hosting parties.

The door of our fridge got a makeover, too.


Steve and I would constantly be buying condiments or dressings because we thought we were out.  In reality, we already had some but couldn't find any because what we needed was jumbled in with other random bottles and jars.  When you've got three open bottles of ranch dressing, things are out of hand.  So we consolidated all of the dressings in one shelf.  Condiments that would be appropriate for sandwiches or bratwurst got its own shelf (yes, those are four *different* types of mustard).  Toppings like horseradish, capers, and kalamata olives got their own shelf, and so did sauces that we typically use during cooking like Worcestershire, lemon juice, and teriyaki sauce.  I wish I had another small shelf that could live across from the butter.  I'd love a dedicated shelf for things like yogurt and cottage cheese, which I always have to dig for on the "small containers" shelf in our fridge.  I wonder if I can find one online...?

And since I was on a roll, I decided to organize our top freezer as well.


Aside from the bag of ice that we keep for stocking drinks in when we entertain, most of our fridge contents are produce.  We love SteamFresh veggies- they're so easy!  I like to keep frozen berries in the fridge (a cup of berries with Greek yogurt and a tablespoon or two of agave is one of my favorite not-too-bad-for-you desserts).  We also keep grab-n-go meals in there.  Currently we've got a couple packages of Stouffer's stuffed peppers and some homemade twice-baked potatoes holding down the fort.


Our freezer door was a cinch.  One shelf for frozen seafood- prawns and fillets- and one for household stuff that needs to be frozen plus my favorite summer treat- Otter Pops.  Totally takes me back to being a kid.  There's definitely more veggies and ice than protein in our freezer, but that's because we have a chest freezer out in our garage.  That's where all of our chicken breasts and thighs live, along with what's left of a quarter of grass-fed beef we split with Steve's parents last spring.

We've lived with our fridge and freezer this way for about two weeks.  Overall, this arrangement has been working really well for us so far.  It's more visually appealing   It's easier to find what you're looking for and easier to tell what you're missing.  We've actually been able to make less trips to the grocery store because we're more likely to know exactly what we have and what needs to go on the grocery list at any given time.  We're not losing any random perishables in the back corners of the fridge.  And we're finding that we do eat more produce now that it's more visible and easier to access.

Anyone have more fridge and freezer organizational tips and tricks to share?

Jan 12, 2013

File it Away

Not sure about everyone else, but New Years totally puts me in the mood to organize.  No joke.  Something about new beginnings and fresh starts makes me want to de-clutter and streamline my life.

One of those areas that always gets an organization overhaul after December 31 is the financial filing system. The box full of eight-year-old records gets sifted through for any important documents or keepsakes that we might've missed when we boxed them up all that time ago and everything that remains gets shredded and tossed.  All of my 2012 files lived in two storage boxes in our Expedit shelving right next to my head for easy access.  I pulled all of those out, condensed what needed to be saved for records and transferred them to a box in the closet.

Put it right back in the empty 2005 box, just changed the label.

As I was sifting through all things 2012, I groaned for the 627th time that the hanging files I had been using were really annoying.  They kept the lid from closing tightly, some of them had pockets inside where things would get stuck, and some of the labels didn't match anymore.  "College Records-Colleen" has been out of commission for almost four years now but I still had a hanging file for it.  What's up with that?  So I decided enough with the groaning.  It was time to switch up the way I file my records to make my life easier.

First I did one of the things I am best at in life: I made a giant list.  I put every type of utility bill, loan, and financial or confidential paper I typically save on the list to help me see if there were some areas where I could consolidate files or maybe just needed to sort them in a different way.  Sure enough, I had a lot of that.  In my old filing system, I had a folder for my school loans, one for Steve's school loans, one for our car loan, one for our credit card, one for random retail credit cards we rarely use... you get the picture.  Why have a bunch of hanging files when they could be consolidated under the heading of Credit & Loans?  So I ended up re-categorizing where I'd store some of our records, and decided that instead of hanging files, I'd use expandable files and tabbies on top to do my organizing.

Office supplies- yum.

It's so much better!  And the best part is that it fit in only one box, meaning I gained a whole cube of storage space!  So I used that to my advantage.  I put the "to be filed" box up at eye-level so I'd be more likely to put things in it and remember to file them (ha!).  I also moved my pens and scissors a little closer to me so that I could see them more easily.  And I scooted the records box more towards the middle of our desks, since I don't need access to it more than twice a month.  I am loving the final result.

Somebody needs to get on the dusting, pronto.

I can find things easily.  I can put things in easily.  And I also love that I can do this:

Need to dig through a file?  Just pull it outta the box!

I'm feeling pretty good about this organizational upgrade.  The Type A in me wonders if there's an even easier way to do it.  What's your best file organizing tip?

Nov 14, 2012

Adventures in Cleaning Microfiber

Last winter, Steve and I purchased our big gray living room couch from Macy's on super-duper sale.  It was microfiber, which we loved- in addition to being deep and wide, the couch is velvety-soft.  But I wasn't totally sure how to clean it properly.  And as with any item that you love (and/or cost more than a couple of bucks), I want to keep it in as good condition as I can.

Even so, we do live real life around here.  We've got dogs that get up on that couch and as any dog owner can attest, dogs create schmutz (official definition here).  Also, sometimes Steve and I eat food while sitting on that couch watching movies.  And even though we're careful, sometimes we get a little schmutz on the couch too.

So I found this great tutorial on (where else?) Pinterest for cleaning microfiber.  I linked into Chris & Robin's Nest Blog and followed their instructions.  I experienced great results using their cleaning method without harming the microfiber.


One problem.  It took FOR-EV-ER to spot clean all of the schmutz.  And it made my arm tired.  I'm lazy, remember?

So this week, when it was time to clean the schmutz off the couch, I opted to be a risk taker.  I pulled the microfiber cover off one of the throw pillows and threw it in the wash.  I ran it on a delicate wash cycle with minimal detergent and a delicate dry cycle while biting my fingernails and hoping I wouldn't have to sacrifice a pillow because it shrunk or faded due to my recklessness.  Thankfully, it turned out great!  No color change at all, no shrinking, nothing.  And NO sign of the schmutz!  I did a happy dance and threw all of the pillow and cushion covers in the wash, and now we have a nice, clean, non-wrinkly, non-schmutzy microfiber couch again!

Success!

 Well, at least for a few minutes....

Indy the schmutz culprit.


Jul 26, 2012

I Just Met You

Habitat for Humanity finally opened a Re-Store in Everett a few months ago, and Steve and I went to take a look around with the in-laws.  Steve and I hadn't planned on buying anything.  But we found something there that made me feel a little Carly Rae Jepsen.  You know,
I wasn't looking for this/
But now you're in my way.


It was so pretty.  Stainless.  Nice high arc neck.  Pull out head.  Pause button.  Single handle.  Nice.

I just met you


Here's the deal.  We didn't need a new faucet.  Sure, it was on the list of long-term projects, but our existing kitchen faucet was perfectly functional.  After 5 years of abuse it wasn't exactly "pretty" but it was definitely a long way from being an eyesore.  Our plan had been to upgrade the sink and faucet when or if we manage to upgrade our existing counter tops.  Sounds practical, right? 


And this is crazy

The fancy new faucet was marked for $160.  Although it was brand new, it didn't seem like *that* great of a buy.  Come on, we were at the Re-Store, where spanking new solid-core interior doors are priced at $5.50.  Nevertheless, it seemed like a better deal than we'd be likely to get at Lowe's or Home Depot for that type of faucet.  We were tempted.

Here's my number

It was in its original box complete with label, so I whipped out my iphone and googled it.


So call me maybe

List price $790?!?!?!  On sale for $406???  Believe it or not, several other places carried this discontinued Moen faucet, most of them priced around $500.  Dude, $160 was 80% off of the list price.  We couldn't leave it there.  Ir was a total impulse purchase, and we couldn't be happier.

Our morning the following day looked like this.


And then it was done.  We love it!


My camera thinks it's hard to look right at you, baby.

Compare for yourself.

Before


After

Aw yeah.  I'd have included a wide-angle shot so you could see how much better the scale of the high-arc neck is with the rest of the kitchen, but honestly there was too much junk on the counters and I was too lazy to clean it.

And now for several gratuitous poorly-lit pics of the fancy new faucet!  (Time for me to get the paint ladder out of the side yard.)


I used a method for deep-cleaning stainless steel sinks that I found on Pinterest.  Worked pretty slick and shined everything right up (not that you can tell from my pictures)!  Check it out on my Pinterest board!