Pages

Jun 3, 2012

Plunger Problem Solved!

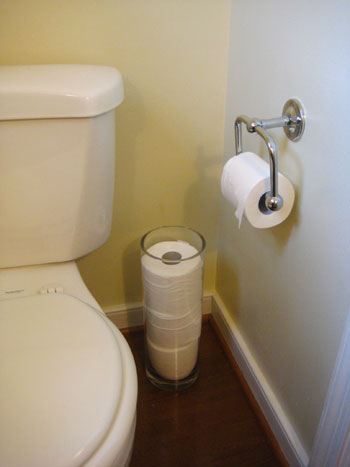
I am so thankful for people that read this blog!  Monique read my post about our guest bathroom and my continuing struggle with figuring out how to lessen the ICK factor of having a plunger out in full view, leaving germy water all over the floor.  One of her suggestions for dealing with this was to hide the plunger in a toilet-paper storage container.  Although most of the toilet paper storage solutions I've seen are little wooden cabinets, I have read about storing TP in glass vases.

From Young House Love.

I wondered if I could find a vase large enough to hold our plunger.  Glass would be non-porous, so the germ party would be contained.  And it'd wouldn't get damaged from water like a wooden TP cabinet would.  And best of all, glass would be super easy to clean.  So I checked Ikea's website.  Nothing large enough.  Then Target's website.  No luck there.  I checked at Hobby Lobby, remembering they had large square purple glass vases last time I was there.  All sold out.  Next I tried Pier 1 Imports.  And I saw this.

Hello?  Is it me you're looking for?

It was beautiful, but I wasn't completely sold.  It looked like it might be just-barely-big-enough or just-barely-too-small.  The aqua color is not one that we have going on in that bathroom, and I wasn't completely sure it would play well with the silvery greens, grays, and plums going on in there.  And it was not on sale.  It seemed like a lot of money to spend on something that I wasn't even sure would do the job.  But I figured, what the heck.  I'll just buy it and bring it home.  If it's wrong, well, that's what receipts are for, right?

So we tried it.  Drum roll please....

Success!!

The vase was juuuust large enough for the plunger.  And juuuuust tall enough to not bang against the toilet tank. It's like it was made for that corner.


Double success!

And although my iphone can't take a picture well enough for you to tell, the color plays very nicely with everything else in the room.  You'll have to take my word for it.


No more germy mess on the floor!

I'm sure the folks at Pier 1 did not have this function in mind when they sold this line of vases, but it worked out perfectly for us.  Thanks for your advice, Monique!


Jun 2, 2012

Mantel Madness: Part Deux

It's been a few days since I stained the mantel Steve made, so it was time to wrap this project up.


Ready for more.

I mentioned how I wanted this bad boy to look like an heirloom found in a long-forgotten attic.  I decided I'd give the dry brushing technique a try.  Here's an inspiration pic that will show you the type of look I was going for.

From Perfectly Imperfect.
I decided to use the same creamy white that's on the side tables Steve made, Valspar's Woodrow Wilson White.  You start by getting just a tiny bit of paint on the end of the brush.


Just a smidge.

And then you dab your brush on a clean dry rag.


Old tee-shirts.

Then comes the tricky part.  Applying very little pressure, move the brush very quickly back and forth.  Like, quick!  Not like you're trying to paint it, like you're trying to dry the brush out.  If you've got too much paint on the brush or you move too slowly, you get weird purposeful-looking streaky marks instead of a blended aged look.


Moving too slow.

The good news is that sanding *while the paint is still wet* can help blend your boo boos and add to the aged look.  I used a 220 grit sponge sander and it worked like awesome.


Smooth like buttah.

After one coat, here's what it looked like.


Getting there!

 And after two coats...


Ooh, blendy.

 And then after a third coat we were done!

Pretty, ain't she?

Here's my favorite thing about the dry brush technique: the paint is practically dry as soon as you're done.  No waiting 24 hours.  Try 15 minutes before you're good to handle it.  So of course I made Steve hang it up for me, pronto.


Husband of the year.

It looks kind of whitewashed in the photos, but in person it looks almost like weathered barnwood.  It really makes the trim detail pop, and highlights all of the imperfections in the wood- the knots, the grooves, the rough cuts.


Lurve.

It's neat how it looks so rustic hanging out above the wacky 80s piano.  It makes you notice the 80s-ness less, I think.  Except for when I point it out.

All done!

Now that the mantel is up, I have a couple of decisions to make.  I'd like some type of task-lighting for playing the piano (and the corner by the TV is just kind of dark anyway).  And I'm curious about what's going to go between the top of the piano and the bottom of the mantel.  I've got a couple of ideas, but nothing I'm totally sold on yet.  And then will come the most fun part- decorating that baby up!  Cannot wait!

FYI, Steve had so much fun making this mantel for me that he said he'd be willing to make custom mantels for other people, too.  If you are interested, let us know!


Jun 1, 2012

Mantel Madness: Part 1

You saw the mantel that Steve made me here.  It's still eighteen kinds of awesome.

But I am so excited to take this baby to the next level.  It's stain time, yo.

The hubs kindly removed the mantel from its place of honor on the wall and propped it up on sawhorses for me in the garage.  So sweet.


In the nude.

I love doing this kind of stuff.  It makes me feel like I actually have some artistic talent.  It's nice to shake the cobwebs off the right side of my brain.

The only supplies I needed to buy were some cheap foam brushes.  I got two sizes from Hobby Lobby, $1.33 a package.  Almost broke the bank with that purchase.  Except that my mother-in-law refused to let me pay for them.  So technically, these babies were free for me.  Wasn't that nice of her?  I think she may have ulterior motives in feeding my desire to paint the world... not that I mind!


An excuse to visit Hobby Lobby!

First thing's first.  You don't want to be staining naked wood without some preparations.


Less blurry in real life.

Pre-stain is ridiculously easy.  Just make sure you're sanded and dust-free, then break out a clean foam brush and go to town.  You don't really have to worry about it streaking, because it's clear.  The hardest part is making sure that you've covered all of your surface area, because it's clear.  After 15 minutes of drying time, I broke out the friend we used on our Restoration Hardware knockoff end table- Minwax Dark Walnut.

Well-loved.

A new foam brush (this time a nice small one to make sure I could get stain into all the little details) and I started in on the dark walnut.  I tried to apply as thick of a coat as I could without getting drippy, and let it dry for a full 15 minutes before wiping the excess up with a clean, dry rag.  Here's how she looks after the first coat.


Our mantel just got back from two weeks in Cabo.

Immediately afterward, I got cracking on the second coat.  I used the same technique, and even applied a couple of coats to areas where the stain wasn't taking as well.  Add another 15 minutes of dry time and then wiping with a new rag, and here's how she looked.


Showing off its dark side.

Yayyyy!!!  Super happy with how this step of the mantel transformation went.  I'm not sure why the detail shot below looks so light.  She is definitely a richer, deeper, blacker brown in person.


Man, I need a better camera.

So the mantel has been hanging out in our garage, de-stinkifying and waiting for me to get on with phase two: dry-brushing.  If all turns out well, our mantel will look like something you had found in your great-grandmother's attic- a timeworn heirloom.  Hopefully I'll be ready to share pics before the weekend is over!